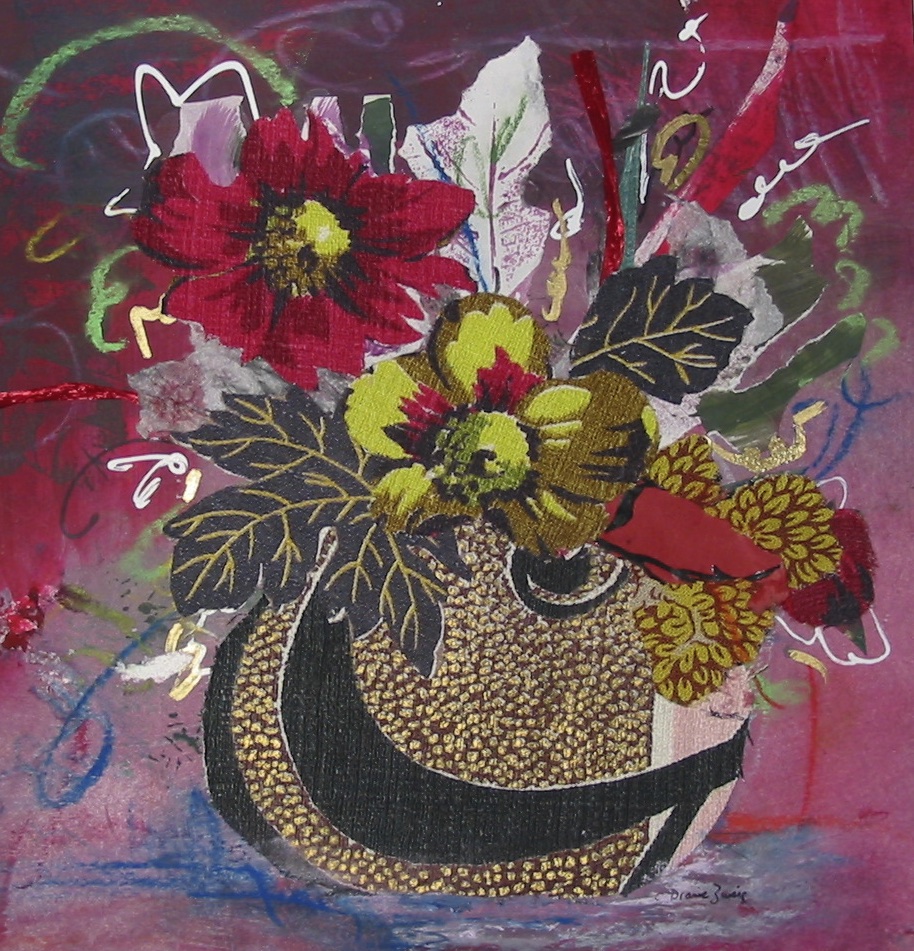
Writing Gibberish Using A Silver Uniball Gel Impact Pen On Black Paper For Mixed Media Collage

IMG_9453.jpg

I have been spending the cold months writing gibberish with all types of fine-liners. This collage was my break out piece with writing on black paper with a Silver Uni-ball GEL IMPACT pen. The key to writing gibberish is to make your writing look like real language but truth be known, there are no real words, just flowing "scribbles" which look a lot like real words or letters. I found it much easier to pretend to write when I was passionate about my gibberish. In this case I was expressing my "words" thinking about how exasperated I was with the political climate in Washington. That inner dialogue made for some wonderful free flowing gibberish! 

Mark Making On Newspaper: Taking My Cues From Picasso

Just like Picasso, I enjoy working on newspaper as a pleasant change from painting or drawing on a plain piece of white paper. There is nothing more satisfying to me than the rich black lines you get from using a Sharpie pen directly onto newspaper. It's fun (and relaxing) to outline the newspaper columns or create new forms and designs covering over photos and advertisements. After working at my drafting table for awhile, the smell seems to knock me over and I know its time to open that window and to take a Sharpie break. Then I might add some acrylic paint to the newspaper shapes using the end of a piece of cardboard, a plastic credit card or even a brush to smear or apply the paint. When the paint dries I might bring back more marks with the Sharpie.  Painted papers can be used in collage or as solo pieces of work. 

Creating Textures Using A Brayer Dipped In Paint And Rolled Over Mesh To Create Niblets

When you are making painted papers  for Mixed Media collages or working directly on a support (paper, canvas, art board etc.)  you may want to add texture to your piece. In MIxed media, many different types of wet and dry media are used to offer a variety of marks, strokes and textures.  A really cool way to create texture is to roll your brayer into a puddle of paint and than to roll the brayer again over a remnant of plastic mesh before finally rolling the brayer onto your work. The result will be the creation of nibs on the brush that will create a wonderful pattern once the brayer is rolled onto a Mixed Media piece. You can also try rolling the brayer (with paint already on) onto other interesting objects that you use for texture such as corrugated cardboard or patterned wallpaper samples.   

Toy Parts Have A New Life In Mixed Media Collage

Don't feel guilty if you are a Mixed media artist who pokes through bundles targeted for charity . Even though I donate toys, clothes, linens, household items to local organizations, I also keep in mind whether a particular object can be used in my art making projects and I separate it out form the giveaways. Let's call it like it is, Mixed media artists are scavengers. In the photo shown, I saved this blue game part to use to create circular patterns in my Mixed media collages. While it looks like a stencil, it was actually part of a child's game unrelated to art. You can draw into the circles or paint over the circles leaving an impression with the paint.         

Printing With The Back Of A Ceramic Tile In Mixed Media Art

IMG_9622.JPG

Next time you come across remnants of ceramic tiles, take a look at the back of the tile. Often there is a very interesting pattern on the backside of the tile which can be used as a printmaking tool in Mixed media art. In the tile shown, I painted orange paint on the underneath side of the tile and then stamped or printed with the tile onto my work. I will use this tile over and over again, adding different colors when needed. You can also over stamp with the same color creating more patterning and textures on your work.

CityScape Styrofoam Printing: Mark Making and Collage By Rosalie Gustafson

What a treat visiting Rosalie and Ray Gustafson, both artists who have a whimsical gallery and Frame shop called "Ray's" at 53 Poqonock Avenue in Windsor, CT. Rosalie always shares lots of her art tips and makes you feel right at home in her showroom. The shop is small but carefully planned to make to make every nook and cranny count. Rosalie enjoys variety in her work and often mixes her media to create interesting textures. One of her favorite techniques is to cut a landscape or cityscape design into a piece of Styrofoam (the kind found in the meat section of the grocery store) and to coat with paint and print with. She has done many paintings with a city scape theme that she starts out with the technique just mentioned. Than she collages painted or printed papers onto the original painting.

Using Old Game Parts Popular Elements For Mixed Media, Collage, Assemblage Artists

If you are thinking about cleaning out your attic, cabinets or basement and tossing out old children's toys and games...stop! There are plenty of artists who use game parts, tiles, images, puzzle pieces, Legos and more in their work. Many of my art friends are scavengers who are forever looking for your vintage Board games and accessories to use in Assemblages, collages, Mixed Media etc.  You will now find many collectibles vendors who bundle up old toy parts and sell. So consider either passing along your collections to an artist who would love to hit the jackpot with your donation or reasonably selling your stash of toy goodies. Image shown was done by Mixed Media artist Carolyn Tertes (see my earlier article (http://cdiannezweig.blogspot.com/2011/11/mixed-media-artist-carolyn-tertes.html)

Artistic Intuition: When to Crop and When To Resolve a Piece As A Whole

When I am making Mixed Media artwork I like to keep a pre-cut Mat "window" nearby to help me isolate parts of my work in progress that may actually be more exciting than if I kept the "whole" piece intact. I have been criticized for giving up too soon on "resolving" a whole piece and I understand that comment. I even at times feel a little guilty for reaching for my mat window, but I also appreciate that I respect my visual eye and if cropping is what is called for....that is what my artistic intuition tells me. Some guidelines that I use when I am making this decision to crop or cut up a piece of work is does the section I have highlighted show more composition integrity and or excitement than the piece as a whole? Sometimes eliminating "noise" or complexity is helpful. Are the color relationships keener in the smaller section chosen?  Do I get more drama, serenity, mystery, movement etc. in the portion of the artwork that I have chosen to feature. These are some ways to think about should you crop or not.    

Mixed Media Tip: Work On Top Of Large Sheets of Drawing Paper to Catch Spontaneous Marks And Paint Layers

It really is true that sometimes the palette with a mixture of the day's paint caked on can appear at times to be more interesting than the work in progress. The same can be said for the glorious accidental spills and drips and strokes that appear on the under sheets or table coverings that many of us place down on our workspace before beginning a Mixed Media project. I always encourage new students to intentionally work on top of layers of paper.  My favorite paper to use under work is 18 X 24 Drawing paper (which comes in gummed pads at your local art store) or rolls of white paper (Restaurant supply companies). These wonderful painted papers can be torn and   used in collages or worked back into later as paintings and drawings without tearing. 

Let Loose With Creative Aging: New Visual Arts Program for Older Adults at The West Hartford Art League This Fall 2016

Throughout the country, especially in larger cities, older adults are finding more and more programs geared for their special needs. While I have many friends who are artists and in their eighties, with more energy and mobility than plenty of people half their age, there are plenty of older adults who need a jumpstart to leave their homes and make art! With this in mind, I developed a brand new program at The West Hartford Art League in West Hartford, CT geared for adults who may be returning to art after many decades or who finally want to try their hand at something new. My new class "Let Loose With Creative Aging" will run Wednesday mornings at the WHAL. Some unique aspects of this class is that caregivers can accompany  participants to class and that individuals with early dementia can feel comfortable attending.   For more information see http://www.cdiannezweig.com/workshops/

Oil Based Permanent Ink Chunky Paint Pen by Sharpie Great Product For Mark Making

 I am hooked on Sharpie pens for mark making. But every time I think that I own every single black permanent marker made, I discover yet another gem from this company. My newest art "toy" is a big fat chunky oil based black paint pen marker  with permanent ink. Favorites among graffiti artists this product creates a shiny thick line which appears to cover over almost all over media. You get started by shaking the paint pen and then once you remove the cover, you are good to go and can make gorgeous black marks to your heart's content. As you can see, I have really "broken in my Sharpie paint pen. 

A Noisy Summer Inspires Cityscape Collages

A few summers ago they were doing construction work in front of my studio and the machinery was reminding me of visits to New York City, where noise is always in the background. I found myself having a very difficult time working as my sensitive brain was feeling on overload. That summer, I channeled the "noise" of the construction into cityscapes. The black lines suggest rooftops and buildings. I particularly like the piece of paper which reminds one of bricks. That was accomplished by stamping with the backside of a broken floor tile which had raised ridges which created that pattern.  

Mixed Media Collage Using Vintage Barkcloth

This retro inspired Mixed media Collage combines, acrylic paint, paint pens, scraps of vintage barkcloth fabric and pastels. The first step in this project was to paint a background using watered down acrylic paint. Next i created my floral arrangement using lots of scraps from different remnants of fabric. My favorite part was adding the marks with a white paint pen and pastels. Most of my work is abstract, so it always amazes my friends that every now and then, I create something that looks like something recognizable! This is part of a series of six very different arrangements  which I had a lot of fun with.


Let Loose With Collage & Mixed Media: Spring Workshops at Dick Blick, Plainville, CT

UPCOMING SPRING CLASSES

Contemporary Mixed Media-Collage at Dick Blick Plainville CT.  MAY 2016

Let Loose With Collage & Mixed Media: Leave your inner critic home and join others in the art of creating Mixed Media artwork and collages using painted papers, print making techniques, textures, mark making, dry and wet media.  Emphasis on helping students “loosen up” and work more spontaneously with a variety of art materials and products. All levels of students welcomed.  Day/Time: 4 sessions on Wednesdays 1:00 - 3:00, May 4,11,18, 25. Fee $120.00.

image001.png

Material List

The beauty of Mixed Media collage is that you can use every thing and the kitchen sink  in the process of making art. While I have my favorite products, you are welcome  to bring to class what you already have and to build materials and supplies as you discover new ideas. My favorite essential materials are Canson Drawing paper ()or similar) in a gummed pad (any size works); Acrylic paint; brushes of different sizes; Sharpie Markers; Crayons; oil pastels. Other materials to collect and bring include products that can make textures such as mesh bags from onions, bubble wrap, corrugated  brown packing paper that have different kinds of ridges, wallpaper that has raised texture, combs, inserts from candy boxes that have patterns and interesting surfaces etc. BTW, I also smear paint with old glossy post cards or card board that i fold to size. We will discuss adhesives in the first class.  http://www.cdiannezweig.com/workshops/

The Aftermath of The Painting Storm: A Mixed Media Blessing

Right now I am in my studio struggling with a HUGE painting I am working on. I'm out of my comfort zone and wondering just how many layers of paint this piece can take before the painting weeps in agony. (Or maybe it is just me weeping in agony). The ability to stick with a project through thick and thin (no pun intended) took me years to learn. At certain points I have actually "attacked" my painting in a frenzy of heightened frustration. After all, if you are at your wits end, why not go ahead and "ruin it" ! Interestingly enough, some great things happen after these painting storms. The splashes of paint, the drips, the bold strokes seem to add just the right touches to reawaken a piece that was previously viewed as hopeless and that we wonder if we should kiss goodbye.